

写在最前
虽然标题写着基于 Docker 或 Kubernetes,但实际初始化过程是通过下载安装包来完成的。
https://github.com/vmware-tanzu/velero-plugin-for-aws
1. 下载安装
# 到github中下载对应使用你k8s版本的velero二进制安装包
wget https://github.com/vmware-tanzu/velero/releases/download/v1.15.2/velero-v1.15.2-linux-amd64.tar.gz

# 解压并复制到/usr/local/sbin
tar -xf velero-v1.15.2-linux-amd64.tar.gz
cd velero-v1.15.2-linux-amd64
cp velero /usr/local/sbin/


# minio 账号密码
cat >credentials-velero<<'EOF'
[default]
aws_access_key_id = 账号
aws_secret_access_key = 密码
EOF

# 在安装 Velero 之前,请先在 MinIO 中手动创建存储桶 k8s-backup,作为备份数据的存储位置。
# 以下s3Url 参数将填写为 MinIO 的实际访问地址(如 K8s 中的 Service 地址)。
# --default-volumes-to-fs-backup  待试验
velero install \
  --velero-pod-cpu-request 500m \
  --velero-pod-mem-request 0.5Gi \
  --velero-pod-cpu-limit 1000m \
  --velero-pod-mem-limit 1Gi \
  --node-agent-pod-cpu-request 500m \
  --node-agent-pod-mem-request 0.5Gi \
  --node-agent-pod-cpu-limit 1000m \
  --node-agent-pod-mem-limit 1Gi \
  --use-node-agent \
  --provider aws \
  --plugins harbor.bx.crpharm.com/k8s/arm64/velero/velero-plugin-for-aws:v1.11.0 \
  --bucket k8s-backup \
  --secret-file ./credentials-velero \
  --use-volume-snapshots=false \
  --backup-location-config region=cn-north-1,s3ForcePathStyle="true",s3Url=http://10.133.179.3:30051

# 检查存储是否就绪
[root@hybxvdka01 velero]# kubectl -n velero get backupstoragelocations -o wide
NAME      PHASE       LAST VALIDATED   AGE   DEFAULT
default   Available   38s              41m   true
2. 操作流程
2.1 备份知识
默认备份全部卷:会连同所有资源与存储卷一起备份。此模式下,可以在 Deployment 的 Pod 上手动标记哪些卷无需备份。例如,在某个包含大量关键存储卷的命名空间中,几乎所有卷都需要备份,但其中庞大的日志卷没有备份价值,就可以将该日志卷排除在外。
kubectl -n sample annotate pod/app1 backup.velero.io/backup-volumes-excludes=pvc1-vm
velero backup create BACKUP_NAME --default-volumes-to-fs-backup OTHER_OPTIONS
apiVersion: v1
kind: Pod
metadata:
  name: app1
  namespace: sample
spec:
  containers:
  - image: k8s.gcr.io/test-webserver
    name: test-webserver
    volumeMounts:
    - name: pvc1-vm
      mountPath: /volume-1
    - name: pvc2-vm
      mountPath: /volume-2
  volumes:
  - name: pvc1-vm
    persistentVolumeClaim:
      claimName: pvc1
  - name: pvc2-vm
claimName: pvc2选择加入模式:仅备份显式指定的卷。适用于命名空间中卷很多,但只有一两个关键卷需要保护,其余剩余的卷可以忽略的场景。
kubectl -n YOUR_POD_NAMESPACE annotate pod/YOUR_POD_NAME backup.velero.io/backup-volumes=YOUR_VOLUME_NAME_1,YOUR_VOLUME_NAME_2,...
velero backup create NAME OPTIONS...
apiVersion: v1
kind: Pod
metadata:
  name: sample
  namespace: foo
spec:
  containers:
  - image: k8s.gcr.io/test-webserver
    name: test-webserver
    volumeMounts:
    - name: pvc-volume
      mountPath: /volume-1
    - name: emptydir-volume
      mountPath: /volume-2
  volumes:
  - name: pvc-volume
    persistentVolumeClaim:
      claimName: test-volume-claim
  - name: emptydir-volume
    emptyDir: {}
2.2 基本备份
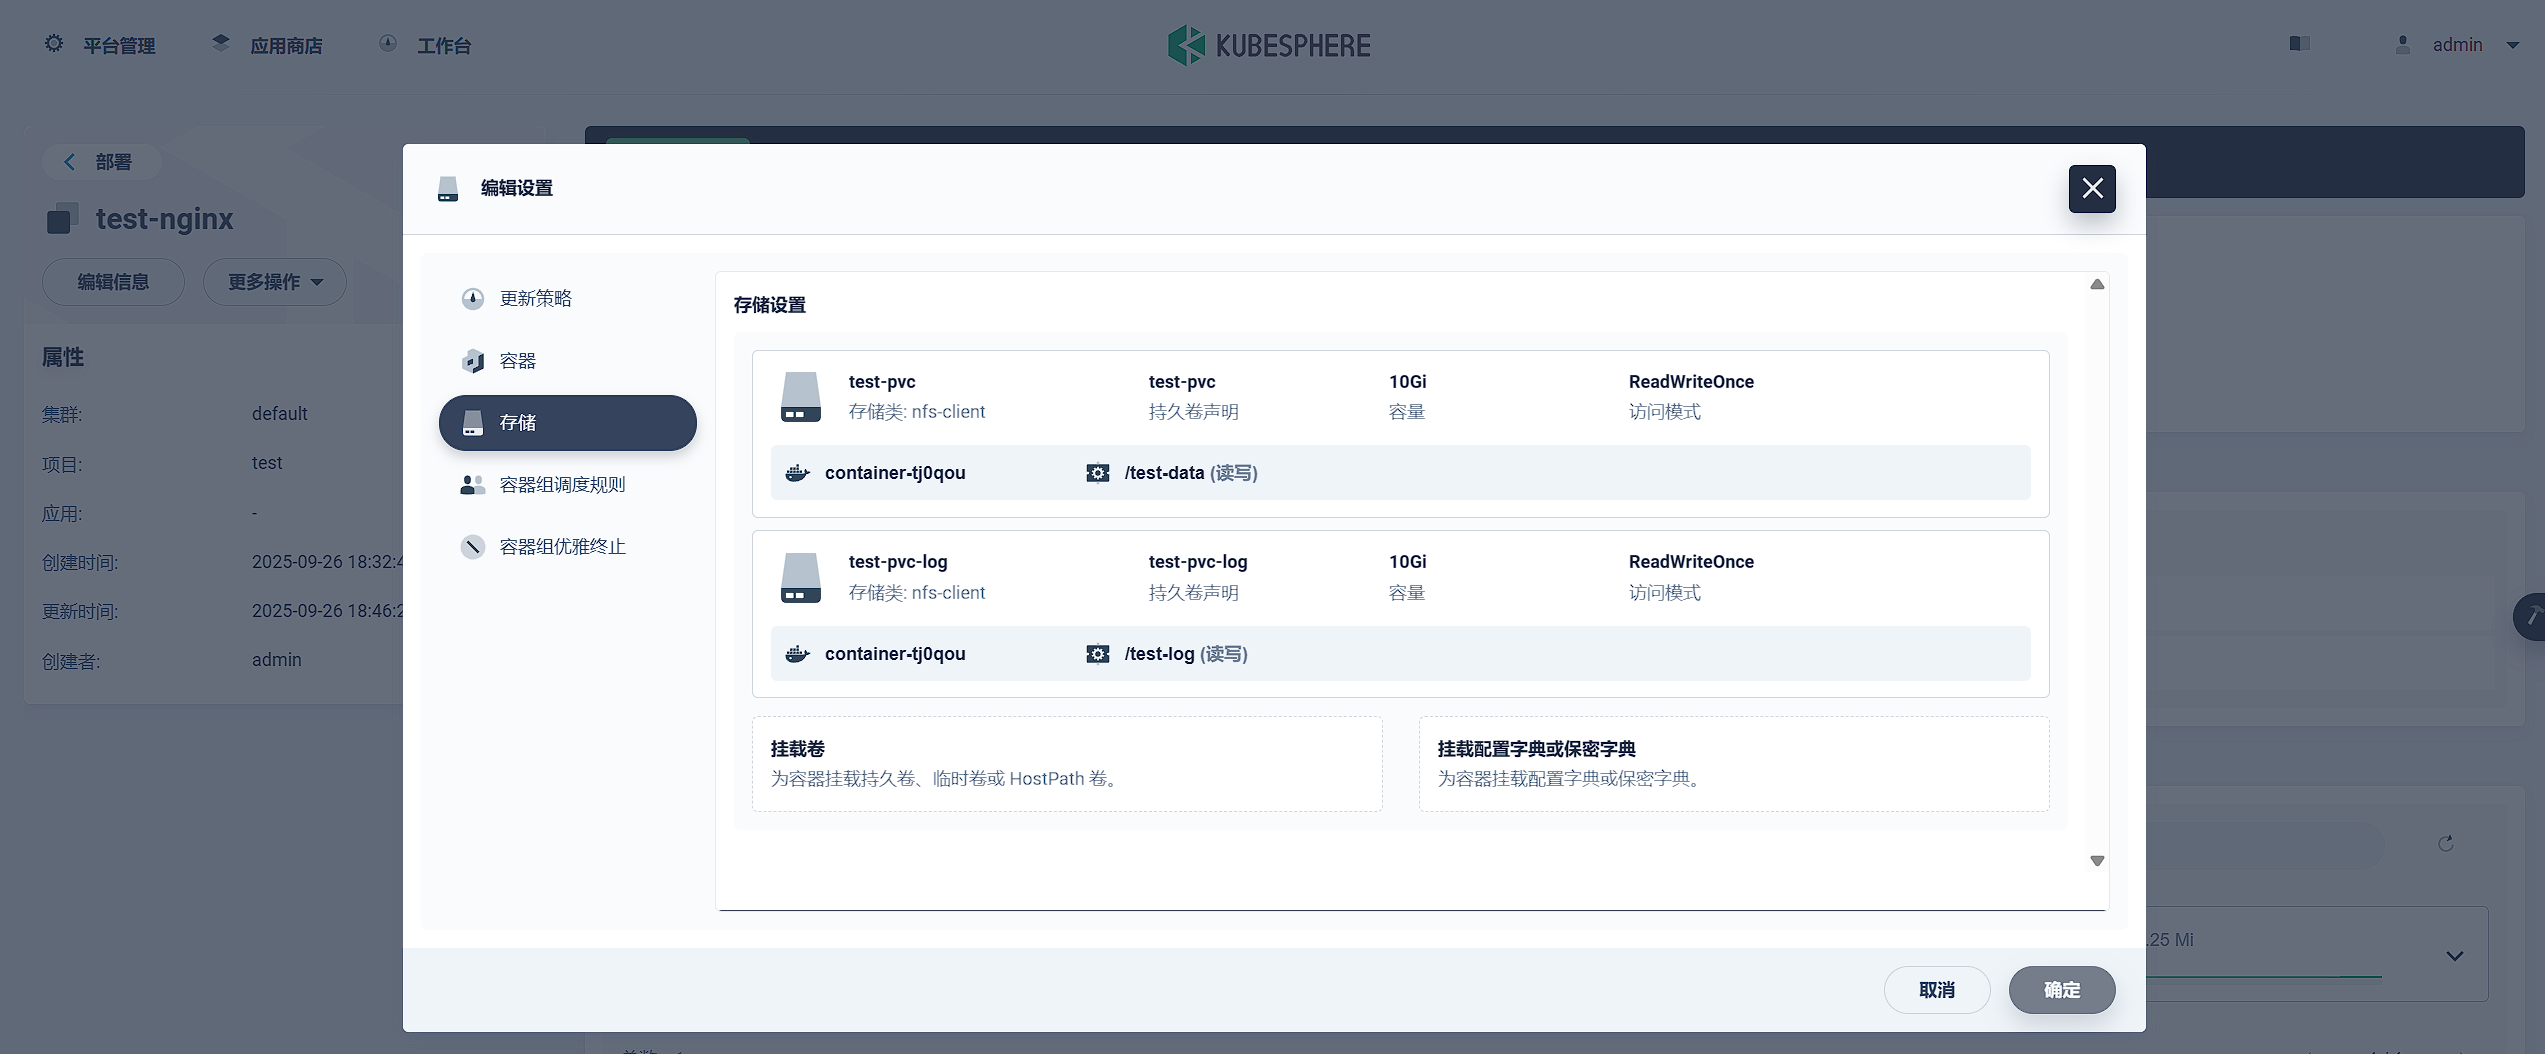
我在 test 命名空间中通过 nfs-client CSI 创建了两个 PVC:test-pvc 和 test-pvc-log,并将它们挂载到 test-nginx Deployment 的 /test-data 和 /test-log 目录下,随后分别往目录中写入了数据。以它来测试备份与还原是否能达到预期
# 执行备份
[root@hybxvdka01 ~]# velero backup create test1 --default-volumes-to-fs-backup --include-namespaces test
Backup request "test1" submitted successfully.
Run `velero backup describe test1` or `velero backup logs test1` for more details.

# 查看进度,嗯~看起来完成了
[root@hybxvdka01 ~]# velero backup describe test1
Name:         test1
Namespace:    velero
Labels:       velero.io/storage-location=default
Annotations:  velero.io/resource-timeout=10m0s
              velero.io/source-cluster-k8s-gitversion=v1.30.6
              velero.io/source-cluster-k8s-major-version=1
              velero.io/source-cluster-k8s-minor-version=30

Phase:  Completed
。。。。。。。。。
2.3 还原备份
# 我们直接暴力删namespace,模拟数据彻底丢失,注意别手抖删错了
[root@hybxvdka01 ~]# kubectl delete namespace test
namespace "test" deleted
# 开始还原
[root@hybxvdka01 ~]# velero restore create --from-backup test1 --include-namespaces test
Restore request "test1-20250926164705" submitted successfully.
Run `velero restore describe test1-20250926164705` or `velero restore logs test1-20250926164705` for more details.
# 查看还原日志,可以看到已经完成拿来 Completed
[root@hybxvdka01 ~]# velero restore describe test1-20250926164705
Name: test1-20250926164705
Namespace: velero
Labels: <none>
Annotations: <none>
Phase: Completed
Total items to be restored: 56
Items restored: 56
。。。。。。。。。。。。。。
# 查看还原资源,可以看到namespace已经还原,并且test-nginx资源也顺利出现,最重要的是这两个pvc也还原出来了,让我们来看看它们有没有数据
[root@hybxvdka01 ~]# kubectl get ns |grep test
test Active 64s
test0176kkt Active 58d
[root@hybxvdka01 ~]# kubectl get deploy -n test
NAME READY UP-TO-DATE AVAILABLE AGE
test-nginx 1/1 1 1 72s
[root@hybxvdka01 ~]# kubectl get pvc -n test
NAME STATUS VOLUME CAPACITY ACCESS MODES STORAGECLASS VOLUMEATTRIBUTESCLASS AGE
test-pvc Bound pvc-f9ab3615-4871-431c-b405-deeaa10f34b8 10Gi RWO nfs-client <unset> 107s
test-pvc-log Bound pvc-7db6a8c9-3e4f-4669-8915-36d1d6e696ca 10Gi RWO nfs-client <unset> 107s
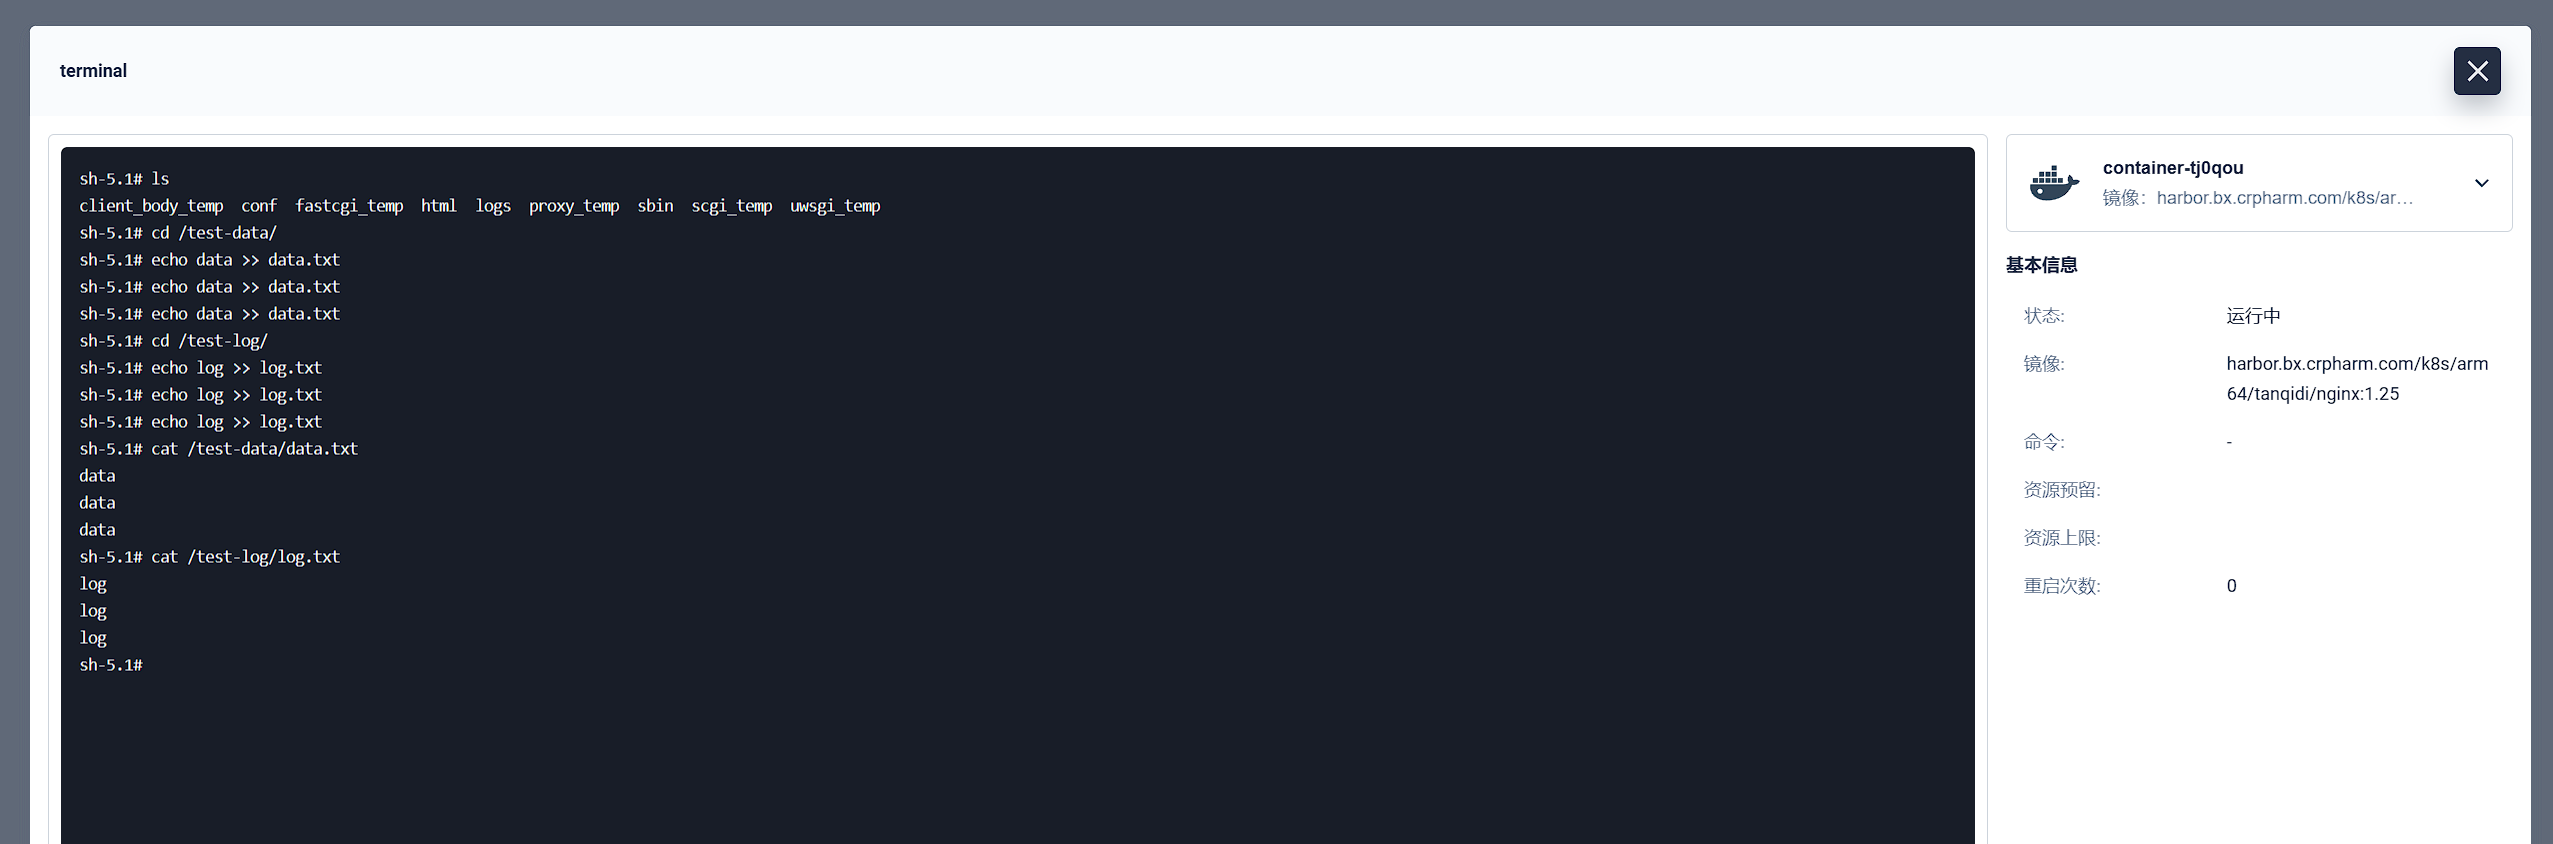
# 进入容器查看这两个目录中的数据,完全正确,pvc的数据也还原出来了。符合预期效果。
[root@hybxvdka01 ~]# kubectl exec -it -n test test-nginx-7ff6f46647-7xws7 -- /bin/bash
Defaulted container "container-tj0qou" out of: container-tj0qou, restore-wait (init)
[root@test-nginx-7ff6f46647-7xws7 nginx]# cat /test-data/data.txt
data
data
data
[root@test-nginx-7ff6f46647-7xws7 nginx]# cat /test-log/log.txt
log
log
log
[root@test-nginx-7ff6f46647-7xws7 nginx]#2.4 常用命令
velero get backup
velero delete backup ?
velero get restore

# 删除所有备份,测试
velero backup delete --all --confirm

# 强制删除这个备份
kubectl -n velero delete backup ? --force --grace-period=0

# 输出详细日志
velero backup describe test1 --detail

# 获取定时任务
velero get schedule
2.5 定时备份
它即支持velero命令来创建也支持使用自定义crd来创建,命令约等于如下
velero create schedule bx-schedule \
  --schedule="0 */12 * * *" \
  --default-volumes-to-fs-backup \
  --include-namespaces bx \
  --ttl 720h
# bx 命名空间
apiVersion: velero.io/v1
kind: Schedule
metadata:
name: bx-schedule
namespace: velero
spec:
schedule: "0 */12 * * *" # 每 12 小时一次
template:
ttl: 720h # 30 天 (720 小时)
defaultVolumesToFsBackup: true
includedNamespaces:
- bx
---
# ripples 命名空间
apiVersion: velero.io/v1
kind: Schedule
metadata:
name: ripples-schedule
namespace: velero
spec:
schedule: "0 */12 * * *"
template:
ttl: 720h
defaultVolumesToFsBackup: true
includedNamespaces:
- ripples3. 高级操作
3.1 选择退出
有时候我们的一些资源是不希望被备份的,例如一些庞大的日志pvc,备份了没什么用。可以给该具体的资源打上注解,backup.velero.io/backup-volumes-excludes: test-pvc-log 这样执行备份的时候,此pvc则不会进行备份
如果启用选择退出那么命令中必须带有--default-volumes-to-fs-backup,例如 velero backup create test1 --default-volumes-to-fs-backup --include-namespaces test 因为默认它是备份所有卷,此刻它等你着排除不需要的。
kind: Deployment
apiVersion: apps/v1
metadata:
  name: test-nginx
  namespace: test
  labels:
    app: test-nginx
  annotations:
    deployment.kubernetes.io/revision: '43'
    kubesphere.io/creator: admin
spec:
  replicas: 1
  selector:
    matchLabels:
      app: test-nginx
  template:
    metadata:
      creationTimestamp: null
      labels:
        app: test-nginx
      annotations:
        kubesphere.io/creator: admin
        backup.velero.io/backup-volumes-excludes: test-pvc-log
        kubesphere.io/imagepullsecrets: '{"container-tj0qou":"harbor-dev"}'
        kubesphere.io/restartedAt: '2025-08-22T09:18:03.124Z'
        logging.kubesphere.io/logsidecar-config: '{}'
    spec:
      volumes:
        - name: test-pvc
          persistentVolumeClaim:
            claimName: test-pvc
        - name: test-pvc-log
          persistentVolumeClaim:
            claimName: test-pvc-log
      containers:
        - name: container-tj0qou
          image: 'nginx:1.25'
          ports:
            - name: tcp-443
              containerPort: 443
              protocol: TCP
            - name: tcp-80
              containerPort: 80
              protocol: TCP
          resources: {}
          volumeMounts:
            - name: test-pvc
              mountPath: /test-data
            - name: test-pvc-log
              mountPath: /test-log
          terminationMessagePath: /dev/termination-log
          terminationMessagePolicy: File
          imagePullPolicy: Always
      restartPolicy: Always
      terminationGracePeriodSeconds: 30
      dnsPolicy: ClusterFirst
      serviceAccountName: default
      serviceAccount: default
      securityContext: {}
      imagePullSecrets:
        - name: harbor-dev
      schedulerName: default-scheduler
  strategy:
    type: RollingUpdate
    rollingUpdate:
      maxUnavailable: 25%
      maxSurge: 25%
  revisionHistoryLimit: 10
  progressDeadlineSeconds: 600
3.2 选择加入
backup.velero.io/backup-volumes: test-pvc 表示只备份指定的 PVC 卷。此时命令中 不能再加 --default-volumes-to-fs-backup 参数,因为该参数的作用是备份所有卷,与“只备份部分卷”的意图相冲突。也就是说,当你已经通过注解明确指定需要备份的卷时,就无需再加全量参数,Velero 会自动识别并仅备份注解中的卷。
velero backup create test1 --include-namespaces test
kind: Deployment
apiVersion: apps/v1
metadata:
  name: test-nginx
  namespace: test
  labels:
    app: test-nginx
  annotations:
    deployment.kubernetes.io/revision: '43'
    kubesphere.io/creator: admin
spec:
  replicas: 1
  selector:
    matchLabels:
      app: test-nginx
  template:
    metadata:
      creationTimestamp: null
      labels:
        app: test-nginx
      annotations:
        kubesphere.io/creator: admin
        backup.velero.io/backup-volumes: test-pvc
        kubesphere.io/imagepullsecrets: '{"container-tj0qou":"harbor-dev"}'
        kubesphere.io/restartedAt: '2025-08-22T09:18:03.124Z'
        logging.kubesphere.io/logsidecar-config: '{}'
    spec:
      volumes:
        - name: test-pvc
          persistentVolumeClaim:
            claimName: test-pvc
        - name: test-pvc-log
          persistentVolumeClaim:
            claimName: test-pvc-log
      containers:
        - name: container-tj0qou
          image: 'nginx:1.25'
          ports:
            - name: tcp-443
              containerPort: 443
              protocol: TCP
            - name: tcp-80
              containerPort: 80
              protocol: TCP
          resources: {}
          volumeMounts:
            - name: test-pvc
              mountPath: /test-data
            - name: test-pvc-log
              mountPath: /test-log
          terminationMessagePath: /dev/termination-log
          terminationMessagePolicy: File
          imagePullPolicy: Always
      restartPolicy: Always
      terminationGracePeriodSeconds: 30
      dnsPolicy: ClusterFirst
      serviceAccountName: default
      serviceAccount: default
      securityContext: {}
      imagePullSecrets:
        - name: harbor-dev
      schedulerName: default-scheduler
  strategy:
    type: RollingUpdate
    rollingUpdate:
      maxUnavailable: 25%
      maxSurge: 25%
  revisionHistoryLimit: 10
  progressDeadlineSeconds: 600
3.3 自定义还原器
为了在使用私有仓库时正常恢复 PVC,需要创建一个 ConfigMap 来指定 Velero Restore Helper 镜像的地址。否则,PVC 在恢复过程中会因为找不到正确的镜像而失败。
https://github.com/vmware-tanzu/velero/blob/60dbcbc60d6df3b1c12cb5ada6a228fb5288a61c/site/content/docs/v1.15/file-system-backup.md?plain=1#L360
kind: ConfigMap
apiVersion: v1
metadata:
  name: fs-restore-action-config
  namespace: velero
  labels:
    velero.io/plugin-config: ''
    velero.io/pod-volume-restore: RestoreItemAction
data:
  cpuLimit: 200m
  cpuRequest: 200m
  image: 'harbor.tanqidi.com/velero/velero-restore-helper:v1.15.2'
  memLimit: 128Mi
  memRequest: 128Mi
  secCtx: |
    capabilities:
      drop:
      - ALL
      add: []
    allowPrivilegeEscalation: false
    readOnlyRootFilesystem: true
    runAsUser: 1001
    runAsGroup: 999
  secCtxAllowPrivilegeEscalation: 'false'
  secCtxRunAsGroup: '999'
  secCtxRunAsUser: '1001'
4. 卸载
https://velero.io/docs/v1.17/uninstalling/
velero uninstall5. 优秀帖子
https://velero.io/docs/v1.17/file-system-backup/
踩坑帖子:https://github.com/vmware-tanzu/velero/issues/5762
自定义还原器:https://github.com/vmware-tanzu/velero/blob/60dbcbc60d6df3b1c12cb5ada6a228fb5288a61c/site/content/docs/v1.15/file-system-backup.md?plain=1#L360
写在最后
使用 K8S 或 Docker 快速部署 Velero
https://tanqidi.com/archives/18da8fed-bacd-44ee-91df-68014573c28b-bdb3d4ac
评论